Digital Production Services Homepage Brown University Library Homepage Brown University Homepage

c u r i o

Imaging rare, unusual, and intriguing objects at the Brown University Library

A more typical look at the camera room

July 11, 2014 by | Comments Off on A more typical look at the camera room

Since I often concentrate on more involved or difficult setups, I thought it might be good to take a look at a setup that we are most likely to encounter at DPS on a day-to-day basis. This image shows an album of watercolors depicting the uniforms of European soldiers from 1791-1808, and represents just one of the over 25,000 digitized objects from the Prints, Drawings and Watercolors from the Anne S.K. Brown Military Collection, one of the foremost American collections of material devoted to the history and iconography of soldiers and soldiering. This is our basic reprographic setup: our digital back is mounted on a specialized lens; and two softboxes (only one pictured) are positioned at the same angle to, and equidistant from, the shooting platform.

cr-01

We have multiple ways that we can approach digitizing a bound volume. Depending on its size and condition, we have different book cradles that we can use to either provide non-invasive, gentle support to a fragile book, or to lightly press open and flatten the pages of more robust, tightly-bound items. Because this book was relatively small, and bound very loosely, I chose to simply lay it flat on the platform (which is covered in 1/2″ thick foam core) and use a foam wedge to support the opposite side of the book. To keep the foam in place, I used a covered brick placed directly behind the foam. Here, the image (from the reprographic camera’s point of view) shows that I’m photographing the back of an illustration; we generally photograph both the front and back of all our materials.

cr-02

We also make sure to include a target in each image. You’ll notice I’m using a medium-sized target made by Image Science Associates here, sitting atop a thin wood block. It’s important to keep the target in focus as I move through the book, which means that the target must be the same distance from the camera as the page that I am photographing. We use a variety of tools to make sure the target and page are the same distance from the camera – foam, wood blocks, etc., – and you can see my extra, smaller target as well as additional blocks I have at the ready as I move through the pages of the book.

I should note that while this is a more typical setup, each object presents its own set of requirements to both care for the actual item but also produce the best quality, most viable digital image possible. Some are certainly more straightforward than others, and some come with surprises like folds that won’t settle or rippling pages. Our setup will start basically the same (support the object, correct focus and lighting) and then we move, with adjustments here and there, to the final product.


To the Moon and Back

June 9, 2014 by | Comments Off on To the Moon and Back

Many of the books and objects that my colleagues and I photograph are hundreds of years old, so it’s not unusual for us to encounter materials that have a bit of dust on them. This past April, though, I encountered an entirely new kind: moon dust.

Scott-70

I had found myself in the extraordinarily lucky position of being asked to photograph the ceremony in which retired U.S. Air Force Colonel and NASA Astronaut David Scott gave the flight data files from the Apollo 15 mission to the Brown University Library. These flight records are the only complete collection in the world that has been to the surface of the moon, and it was a remarkable experience to learn about them, and to photograph the ceremony and a selection of the objects. We were all given careful instructions not to disturb the dust on the objects – it being lunar dust and all.

For more photos and information on this incredible collection, please take a look at the Library blog post here.


A “Glee” filled May Day

May 1, 2014 by | Comments Off on A “Glee” filled May Day

Glee

We’re celebrating May Day with this image of the Pembroke College Glee Club from the Pembroke Archives. The Images of Brown collection, which is home to this image, boasts more than 4,100 items (and counting) that capture the visual history of Brown.

Avoiding Moiré

March 25, 2014 by | 1 Comment

Because we photograph a great deal of prints and engravings, moiré patterning is an issue that we must consistently keep an eye out for. Moiré patterning often occurs during image capture; it can also happen if you’re viewing an image at a certain magnification, but this is easily addressed by changing the magnification. It’s when moiré patterning enters during image capture that you must address it immediately, since it’s difficult to remove without creating more image artifacts.

Moiré patterning happens when your subject has some type of regular pattern – in our case, this is usually regular lines in an engraving, but can also happen when photographing textures on paper or cloth that have a regular weave to them. When the regular pattern of the subject overlaps with the regular pattern of the image sensor, the moiré patterning is born. It’s usually seen as bands of color, or light and dark.

moire-problems

The two images above are examples of both kinds of moiré patterning. The image on the left, with the black-and-white pattern, happened due to image magnification. This image itself was fine, but viewing it at this magnification was problematic. The image on the right, however, shows moiré patterning that happened during the capture process. You can clearly see the bands of color that, rather than being a function of viewing the image, are actually present in the image itself.

Correcting the viewing problem is a non-issue; one must simply view the image on a different monitor or at a different magnification. Correcting the patterning that happens during capture is actually almost as simple: it’s all about the orientation of the original. Because moiré patterning is a function of the relationship between overlapping patterns, all we have to do to correct this is change that relationship; put another way, we have to change the alignment of the patterns. For this object (from our Rider Broadsides collection), I had been photographing all objects in the collection aligned as relatively straight verticals to the sensor. To correct the alignment, I simply tilted the image so it was crooked in the capture (it’s important that this isn’t a 90˚ tilt, but a more arbitrary tilt). This corrected the problem immediately. Below is the final image, as well as a detail of the most problematic area of the object.

moire-okay

The more things change…

February 21, 2014 by | 2 Comments

As winter in New England quickly becomes the house guest that has greatly outstayed its welcome, I thought it would be interesting to browse through the Brown Digital Repository for images of snow in Providence. I came upon this image with a view up Williams Street of the Nightingale Brown House. Trade in the horse-drawn carriage for some contemporary vehicles, and it’s not too far from the Williams Street we saw on Tuesday.

* Update: Many thanks to Ron Potvin, for correcting the information about this image. We have updated the post as well as our metadata in the BDR to reflect his insights.

1207920280640625

Photographing the Break Up of Time

January 16, 2014 by | Comments Off on Photographing the Break Up of Time

While the vast majority of my work involves photographing items in collection, it may also have become clear in my blog posts that I’m occasionally asked to document library events and library spaces. All of Brown’s libraries have some incredible spaces – for research, for teaching, for collaboration, and for study – and Brown has been diligent in their efforts to maintain their libraries as 21st-century learning environments. As a result, I often have the opportunity to document the renovation of these spaces, as well as the items in Brown’s collections that are on view in the libraries.

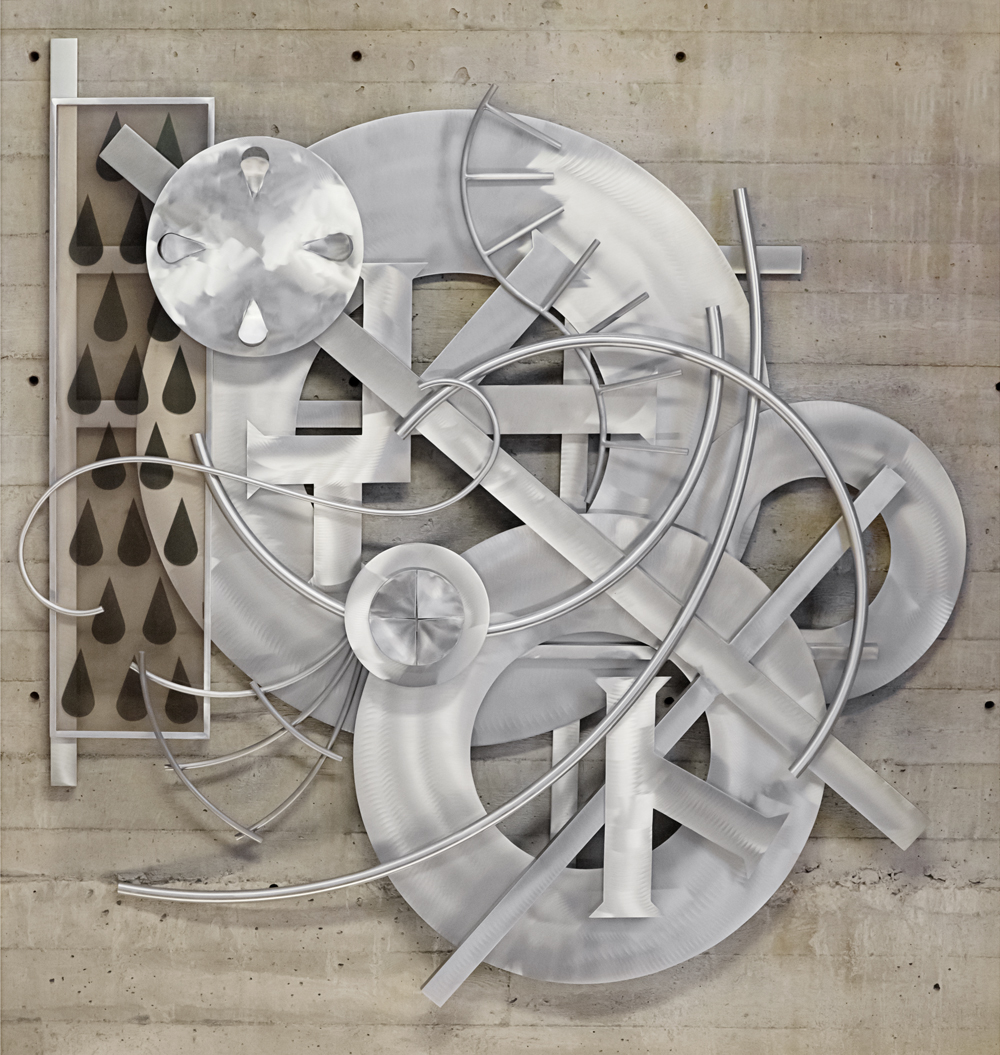
Sculpture-main
This past October, Brown alumna and generous Brown University Library supporter Elizabeth Z. Chace (’59, PHB ’96 hon., GP ’13, GP ’15) donated Break Up of Time, 2006, by John Okulick. The approximately 6′ x 6′ aluminum, resin, and wood sculpture was installed in our Sciences Library, in a bustling open landing right behind the main entrance.

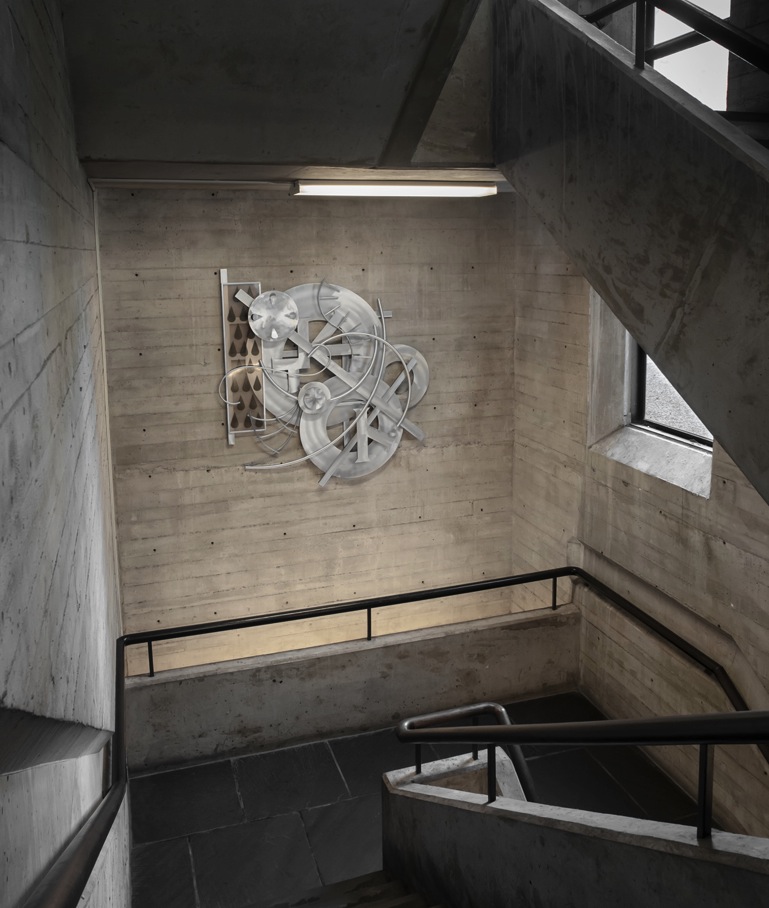
Sculpture-birdseye

The challenging part about photographing the sculpture is its location; it’s great for visibility, but it’s tough to get a nice, straight-on shot of it. The sculpture is also lit by three light sources – overhead fluorescent, tungsten light underneath, and window side lighting. Because it’s a fairly high-polish metal, the sculpture is highly reflective and picks up the colors of the light and walls reflecting off of it.

Using my tilt-shift lens, I was able to get a straight-on shot without actually having to be directly in front of the piece. I bracketed for exposure and white balance to get a clean image (when layered in Photoshop). I also took some images that show a little more of the environment around the sculpture, again trying to avoid as much glare, color cast issues, and unnatural skewing of the object as possible.

This image (left) gives a view from the entrance to the staircase, where most people encounter the sculpture for the first time.


How do you solve a problem like a foldout?

December 13, 2013 by | 5 Comments

When assessing how to photograph a book, we must first make several determinations. The key to photographing books well  – by which I mean providing well-lit images, in good focus, without damaging the book or its pages –  is to provide as much support as possible to both the book itself (especially the spine) as well as to each individual page. Evaluating the needs of a book requires that we look at the following criteria:

  • Size of book
  • Condition of book and its pages
  • Characteristics of leaves (plates, text, foldouts or tipped-in pages)

Smaller books in good condition are photographed on a glass cradle that allows us to hold the book open for optimal photography, but supports the spine and keeps the book in good condition. Larger or more fragile books are shot on a wooden cradle, which supports the book and its spine without putting any pressure on the pages. This requires additional work to get each page flat; some curvature is acceptable, but too much creates focus problems so we often add foam supports under parts of a page to keep it even.

This is a page with a small, minor foldout. Set in the wooden cradle, you can see the book as it’s shot, the nook that the book and page fit into with full support beneath them, and finally, the wood and foam supports that made it all possible.

niche

Then we have books that hit the challenging-to-shoot trifecta: they are oversize, have some element of fragility to them, and the plates involve spreads or foldouts that require even more supports and careful handling (and a sharp eye on even lighting and focus). I spent the past couple of weeks photographing just such a book: an oversize book of engravings that is in generally good condition, but whose spine required a bit of extra support. Luckily, each individual page was thick and in good condition, and the sharp, meticulous engravings made it easy to confirm focus. The majority of the book involved one-page plates, some two-pages spreads, and a handful of foldouts.

One of the foldouts was very large: 20″ x 46″ in total. In order to have decent lighting and any sort of viable resolution, the foldout had to be shot in sections, to be stitched together afterwards. Each section needed to be centered on the platform, at the same distance away from the camera and with no changes to the lighting or focus. The real challenge was to meet these requirements while supporting the book and each section of the foldout. After meeting with our Materials Conservator (the first step in any kind of endeavor like this), she gave me a great plan to make this happen: after the first shot (the part closest to the spine), I set up the book cradle on a book truck, slowly moved it backward to allow the foldout to unfold, and photographed each flat section. As the page opened up and was no longer supported by the pages beneath it, I used Foamcore to keep a level, stable support for the foldout. I also leaned the unfolded parts of the pages against a foam support and kept it in place with a lead rope, to ensure the paper remained intact. Below are the step by step shots (save the final one, which required me to hold some of the foldout closed while taking the photograph with the foot pedal).

IMG_0936

Foldout, Section II & III

IMG_0929

Foldout, Section I


IMG_0950-main

Foldout, Section IV (including book truck and foam core supports)

And then we have the final, fully stitched foldout. I did keep a reference shot with the color target, just to be safe.

folded