About this document
This page documents our development practices. Its primary audience is CDS developers, where it serves as a guide to new colleagues and collaborators, and a reference for existing ones.
Unlike most other areas of the Handbook, the writing here is not intended for general audiences, and assumes familiarity with technical jargon and concepts.
As is the case with all parts of the Handbook, this is a living document in which changes are encouraged as our practices mature and develop. This is version 2024.1
Previous work
Others have done this kind of document: for example, the Developer Playbook out of Stanford University’s Digital Library Systems & Services Group.
Also: our very own BUL DT group started a similar documentation project inspired by the Stanford playbook.
Research on technical approaches has been collected in the document Research on Best Practices for CDS Projects. CDS members should feel free to treat it as a scratch space for notes and links as we decide on practices to be included here.
Executive summary for new CDS code contributors
Here is an overview of standards, guidelines, and tools that we follow at CDS. This appears to be a lot, but it is likely your code does not involve all of these technologies. We have provided links where you can get up to speed quickly.
In general, we use 3rd-party tools (such as linters, etc.) out-of-the-box with default configurations—this minimizes setup and often reflects current industry best practices. Customization is introduced only if deemed unavoidable by CDS.
| Tool or standard | Where can I get up to speed? |
| Styling (CSS) | |
| SASS/SCSS | SASS language guide |
| SMACSS pattern | SMACSS Book |
| Autoprefixer | Autoprefixer online demo |
| Stylelint with the SCSS plugin | Getting started with stylelint |
| Scripting (Javascript) | |
| All code is cleaned up with Prettier | Why?, online demo, and a very detailed talk |
| NPM for 3rd party code management | About NPM |
| A package.json is included in every project | Introduction to the parts of package.json |
Repository practice
This section outlines the use of Git (and GitHub) as a repository for CDS projects at the Brown University Library. The library’s repository is located at https://github.com/Brown-University-Library
This document was initially derived from our practice around the repo for the Stolen Relations project.
Source: This flow was heavily inspired by the GitLab flow (specifically using environment branches), from which we have stolen concepts and text.
Roles
People cycle through positions, so in this document we will refer to roles that don’t map exactly to job titles. As of September 2022, the roles are occupied by:
| Role | Individual(s) |
|---|---|
| Back end developer (BED) | Birkin Diana |
| Front end developer (FED) | Elizabeth Yalkut and Patrick Rashleigh |
| *D | Anyone who makes changes to code in repo |
| Database manager (DBM) | Birkin Diana |
| Repo maintainer (RM) | Birkin Diana |
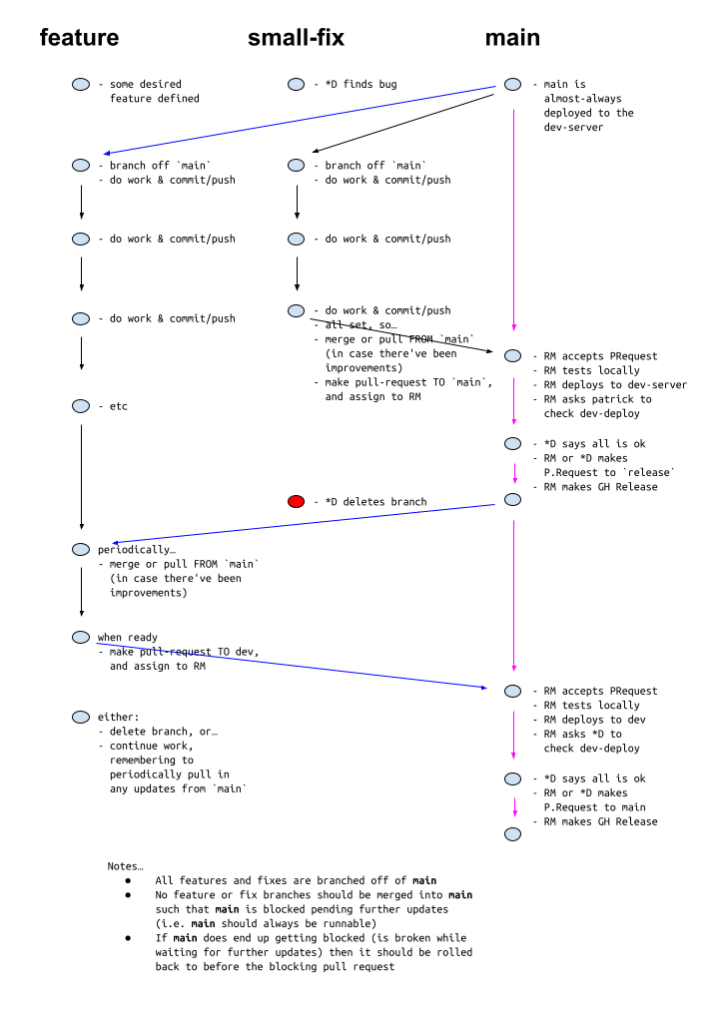
Flow overview diagram
A note about Dependabot notifications
Occasionally GitHub’s Dependabot security service will notify repo maintainers of vulnerabilities. As a matter of practice, high or critical severity security notifications should be acted upon in a timely manner.
Structure overview
A project has a single stable, tested main branch, which is deployed to the production environment. Any other branch can be deployed to the dev environment for testing and demos.
The RMs are responsible for maintaining the main branch and for deploying and tagging releases. The approximate time of deployment is visible as the merge commit in the version control system.
Workflow
How to introduce a feature / make a change
- Create an issue that describes the goal (assuming that the issue doesn’t already exist).
- This helps to inform the rest of the team and to keep the scope of a feature branch small.
- “Parent issues” that affect other, non-developer users are listed in Smartsheets. Technical implementation is tracked with Github issues.
- The issue title should describe the desired state of the system. For example, the issue title “As an administrator, I want to remove users without receiving an error” is better than “Administrators can’t remove users.”
- Create a branch for the issue from the main branch
- The branch name should include the type of change being made and a brief indicator of what the branch covers—and if there is an associated GH Issue, include an reference to the issue # (e.g., bug/#251-add-publicationtitles).
- Change types include:
- Bug
- Feature
- Upgrade
- Hotfix (this should be rare!)
- Multi
- Change types include:
- Err on the side of making frequent small commits. Each commit should include a description of what you have changed. Do not write commit messages that belong on the late lamented commit logs from last night. For details, see Commit Messages.
- It’s okay to bundle multiple small issues on a single branch; if, however, you are working on multiple large issues, each should have their own separate branch. As a rule of thumb, if each commit affects >3 files or more than 10% of a single file, the issue should correspond to a single branch.
- The branch name should include the type of change being made and a brief indicator of what the branch covers—and if there is an associated GH Issue, include an reference to the issue # (e.g., bug/#251-add-publicationtitles).
Merging your new code through a pull request
Asking for code review:
- If you work on a feature branch and are looking for team review, share the intermediate result with the rest of your team by creating a pull request without assigning it to anyone. Instead, mention people in the description or a comment, for example, “/cc @birkin @ashley.” This indicates that the pull request is not ready to be merged yet, but feedback is welcome.
- Mark a PR that is not ready for merge with the Github “Draft” status.
- Your team members can comment on the pull request in general or on specific lines with line comments. The pull request serves as a code review tool, and no separate code review tools should be needed.
- If the review reveals shortcomings, anyone can commit and push a fix. Usually, the person to do this is the creator of the pull request. The diff in the pull request automatically updates when new commits are pushed to the branch.
Reviewing code
A reviewer should confirm the code works as-expected locally and on the development server, including running available tests.
- Note: typically for a django project: $ python ./manage.py test
Deploying to Dev prior to deployment to Production
The Development server environment is used as a final staging area for testing and approval of changes prior to deployment to the Production environment. In general, only one branch is deployed to Development at a time. A reviewer can switch the “live” branch for purposes of review.
See Release process, below, for specifications on how to deploy to Dev.
Merging to the main branch:
- When you are ready for your feature branch to be merged, assign the pull request to the person who knows most about the codebase you are changing. Also, mention any other people from whom you would like feedback. Change the PR status to “ready for review”.
- After the assigned person feels comfortable with the result, they can ask the RM to merge the branch. If the assigned person does not feel comfortable, they can request more changes or close the merge request without merging.
- Do not merge your own branches.
Only RMs can deploy an updated main branch to prod.
Cleaning up a feature/fix branch after merge
Branches should be deleted once the feature or fix has been merged, and/or if the branch is older than 6 months.
The owners of unmerged branches may be contacted for confirmation prior to deletion.
The advantages of branch deletion includes:
- Removing it from the source control software.
- Ensuring that the list of branches shows only work in progress.
- Ensuring that if someone reopens the issue, they can use the same branch name without causing problems.
Front-end standards
HTML
Principles
HTML gives meaning to content so that browsers and devices can then give that meaning to a user, e.g.:
- Headings h1 to h5 form a document outline and can give a table of contents for easy navigation.
- A screen reader gets to a <table> and explains to a blind user how to navigate its content by rows/columns.
- When a user clicks on a <label for=”email”> the associated input control gains focus <input id=”email”>
Semantics are of primary importance in HTML and should not be sacrificed for visual design (e.g., heading size or weight); CSS should be used to manage visual consistency.
HTML should work without the presence of CSS or Javascript. The content should be accessible, form submissions should work, the HTML on its own should have value.
Enforce standards mode and more consistent rendering in every browser possible by using the HTML5 doctype wherever possible: <!doctype html>. Always specify a lang attribute on the root html element, giving the document’s language. This aids speech synthesis tools to determine what pronunciations to use, translation tools to determine what rules to use, and so forth. Most of CDS’s projects will be written in US English and should be attributed as en unless it is necessary to distinguish the content with more detail.
When a document contains content aimed at speakers of more than one language, try to divide the document linguistically at the highest possible level, and declare the appropriate language for each of those divisions. For example, a document that presents Ovid’s Metamorphoses in classical Latin and modern English should likely be attributed to English, since navigation will be in English, and the subsections of Latin should be distinguished. The document root can have only one language attribute.
All CDS projects should be valid according to the W3C.
Use HTML5 elements where appropriate, e.g., header, footer, aside, article.
In HTML5 documents, the heading hierarchy may be restarted within any element that creates a new sectioning context. If a section of content merits its own hierarchy, then use a sectioning element.
Tools
In Django projects, we use the Django template language. In general, projects should use the default or most common templating language if one is used.
Use Prettier to enforce syntax consistency. (See Prettier for more information.)
Style
All tags should be lowercase, including doctype; use double quotes.
To simplify reading code, put classes first in your HTML attributes, and data-* attributes last.
<head> requirements
Below are the essential elements for any web document (websites/apps):
<meta charset="utf-8">
<meta name="viewport" content="width=device-width, initial-scale=1">
<!--
The above 2 meta tags *must* come first in the <head>
to consistently ensure proper document rendering.
Any other head element should come *after* these tags.
-->
<title>Page Title</title>
<!--
<title> is required to be W3C valid.
–->
<!-- Short description of the document (limit to 150 characters) -->
<!-- This content *may* be used as a part of search engine results. -->
<meta name="description" content="A description of the page">
<!-- Refers to a copyright statement that applies to the link's context -->
<link rel="license" href="copyright.html">
- meta charset defines the encoding of the website, utf-8 is the standard
- meta name=”viewport” viewport settings related to mobile responsiveness
- width=device-width use the physical width of the device (great for mobile!)
- initial-scale=1 the initial zoom, 1 means no zoom
Elements
Valid <head> elements include meta, link, title, style, script, noscript, and base.
Consult htmlhead.dev for information about these tags generally; there are dozens, many of which don’t apply (e.g., Chinese browser-specific information). CDS projects avoid the use of <style> tags for CSS, preferring <link> tags. Each project will have its own needs in terms of social/Open Graph information, site ownership verification, licensing, etc.
HTML Comments
HTML comments should be signed by the developer and dated; they should not appear in production code but can be extremely helpful during the development process. Comments are not an appropriate venue for documentation or discussion.
CSS
Favor SASS over CSS
SASS uses the dart-sass implementation. (Note that the terms “SASS” and “SCSS” are interchangeable—at CDS we use “SASS”)
Use the SMACSS system
SMACSS is a categorization and naming system that helps organize stylesheet rules in logical units. Its foundational categories are: Base, Layout, Module, State, and Theme.
Each category has certain guidelines that apply to it, and the guidelines aim to leverage CSS’s ability to codify recurring patterns—things that repeat themselves within our design. Repetition results in less code, easier maintenance, and greater consistency in the user experience.
For an explanation of the system, see the online book Scalable and Modular Architecture for CSS: A flexible guide to developing sites small and large.
Organize SASS files using the SMACSS folder structure, which contain partials, and are compiled into a master stylesheet. We also follow SMACCS’ naming standards for classes.
Code guidelines and organization
Some principles we generally follow:
- Media queries are built mobile first.
- Be intentional when you use // (silent comments) versus /* */ (which are preserved in the CSS output). When in doubt, use //.
- Write classes semantically. Name according to function, not appearance.
For example …- Avoid presentation- or location-specific words in names (e.g. .blue-button or .sidebar-box), as this will cause problems when you (invariably) need to change the color, width, or feature later.
- Name CSS components and modules with singular nouns (e.g., .button or .audio-player).
- Name modifiers and state-based rules with adjectives (e.g., .is-expanded).
- Sort properties alphabetically within a selector, with exceptions for cascade requirements.
- Don’t attach styles to classes with a js- flag. These classes are reserved for JavaScript.
- IDs should be reserved for JavaScript. Don’t use IDs for styles.
- If you’re using !important, stop and consider why you’re trying to fight the cascade. You may have to use it to, for example, override an external library, and we don’t forbid its use entirely, but it should be used with caution.
- Be aware of the emerging (as of 2023) CSS Layers standard
For more discussion of the cascade, see Specificity, below.
Specificity
Source: This section drawn from 18F: https://engineering.18f.gov/css/#specificity
An easy rule to use when dealing with specificity is to start from a low specificity and curve to higher specificity as you move towards the bottom of the output file. Since CSS rules get replaced by rules further down in the file, you’ll override rules in an expected way.
There’s a tool that can graph your files’ specificity, CSS specificity graph. Run your final output file through this tool and strive for a curve trending upwards.
Resources
Rationale
With specificity comes great responsibility. Broad selectors allow us to be efficient, yet can have adverse consequences if not tested. Location-specific selectors can save us time, but will quickly lead to a cluttered stylesheet. Exercise your best judgment to create selectors that find the right balance between contributing to the overall style and layout of the DOM.
- When modifying an existing element for a specific use, try to use specific class names. Instead of .listings-layout.bigger use rules like .listings-layout.listings-bigger. Think about searching your code in the future.
- Use lowercase and separate words with hyphens when naming selectors. Avoid camelcase and underscores. Use human-readable selectors that describe what element(s) they style.
- Attribute selectors should use double quotes around values. Refrain from using overqualified selectors; div.container can simply be stated as .container.
- IDs should be reserved for JavaScript. Unless you have a very good reason, all CSS should be attached to classes rather than IDs. When in doubt, use a class name. This prevents target confusion and allows CSS devs and JS devs to co-exist in the same code in peace. If you must use an id selector (#id) make sure that you have no more than one in your rule declaration.
SASS / CSS pre-processing, linting, and formatting
- Use autoprefixer to handle browser prefixes; do not write prefixes in SASS
- Lint with stylelint and the scss plugin, using the standard config
- Use the –fix flag to correct errors silently?
- Partials are formatted with Prettier.